In this document
- Create a Drawer Layout
- Initialize the Drawer List
- Create a Custom Drawer View
- Listen for Drawer Events
- Peeking Drawers
You should also read
See Also
As part of the Material Design for Android Wear, Wear 2.0 adds interactive navigation and action drawers. The navigation drawer appears at the top of the screen and lets users jump to different views within the app, similar to the navigation drawer on a phone. The action drawer appears at the bottom of the screen and provides context-specific actions for the user, similar to the action bar on a phone. These drawers are accessible when the user swipes from the top or bottom of the screen, and they peek when users scroll in the opposite direction.
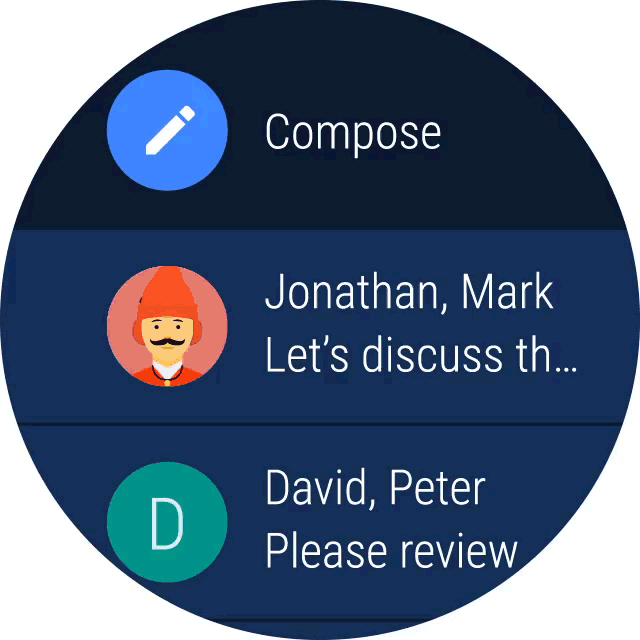
Figure 1. Navigation and Action Drawers.

This lesson describes how to implement action and navigation drawers in your
app using the WearableDrawerLayout APIs. For more information, see the
downloadable API reference.
Create a Drawer Layout
To add an action or a navigation drawer, declare your user interface with aWearableDrawerLayout object as the root view of your layout. Inside
the WearableDrawerLayout, add one view that contains the main content
for the screen (your primary layout when the drawer is hidden) and additional
child views that contain the contents of the drawer.
For example, the following layout uses a WearableDrawerLayout with
three child views: a FrameLayout to contain the main content, a
navigation drawer, and an action drawer.
<android.support.wearable.view.drawer.WearableDrawerLayout
    android:id="@+id/drawer_layout"
    xmlns:android="http://schemas.android.com/apk/res/android"
    xmlns:tools="http://schemas.android.com/tools"
    android:layout_width="match_parent"
    android:layout_height="match_parent"
    tools:deviceIds="wear">

    <FrameLayout
        android:layout_width="match_parent"
        android:layout_height="match_parent"
        android:id="@+id/content_frame"/>

    <android.support.wearable.view.drawer.WearableNavigationDrawer
        android:id="@+id/top_navigation_drawer"
        android:layout_width="match_parent"
        android:layout_height="match_parent"/>

    <android.support.wearable.view.drawer.WearableActionDrawer
        android:id="@+id/bottom_action_drawer"
        android:layout_width="match_parent"
        android:layout_height="match_parent"/>

</android.support.wearable.view.drawer.WearableDrawerLayout>
Initialize the Drawer List
One of the first things you need to do in your activity is to initialize the
drawers list of items. You should implement WearableNavigationDrawerAdapter
to populate the navigation drawer contents. To populate the action drawer with
a list of actions, inflate an XML file into the Menu (via MenuInflater).
The following code snippet shows how to initialize the contents of your drawers:
public class MainActivity extends  WearableActivity implements
WearableActionDrawer.OnMenuItemClickListener{
    private WearableDrawerLayout mwearableDrawerLayout;
    private WearableNavigationDrawer mWearableNavigationDrawer;
    private WearableActionDrawer mWearableActionDrawer;

    ...

    @Override
    public void onCreate(Bundle savedInstanceState) {
        super.onCreate(savedInstanceState);
        setContentView(R.layout.activity_main);

        ......


        // Main Wearable Drawer Layout that wraps all content
        mWearableDrawerLayout = (WearableDrawerLayout) findViewById(R.id.drawer_layout);

        // Top Navigation Drawer
        mWearableNavigationDrawer = (WearableNavigationDrawer) findViewById(R.id.top_navigation_drawer);
        mWearableNavigationDrawer.setAdapter(new YourImplementationNavigationAdapter(this));

        // Peeks Navigation drawer on the top.
        mWearableDrawerLayout.peekDrawer(Gravity.TOP);

        // Bottom Action Drawer
        mWearableActionDrawer = (WearableActionDrawer) findViewById(R.id.bottom_action_drawer);

        // Populate Action Drawer Menu
        Menu menu = mWearableActionDrawer.getMenu();
        MenuInflater inflater = getMenuInflater();
        inflater.inflate(R.menu.action_drawer_menu, menu);
        mWearableActionDrawer.setOnMenuItemClickListener(this);

        // Peeks action drawer on the bottom.
        mWearableDrawerLayout.peekDrawer(Gravity.BOTTOM);
    }
}
Create a Custom Drawer View
To use custom views in drawers, add WearableDrawerView to the
WearableDrawerLayout. To set the peek view and drawer contents, add
them as children of the WearableDrawerView and specify their IDs in the
peek_view and drawer_content attributes respectively. You must
also specify the drawer position with the android:layout_gravity
attribute.
The following example specifies a top drawer with peek view and drawer contents:
   <android.support.wearable.view.drawer.WearableDrawerView
        android:layout_width="match_parent"
        android:layout_height="match_parent"
        android:layout_gravity="top"
        android:background="@color/red"
        app:drawer_content="@+id/drawer_content"
        app:peek_view="@+id/peek_view">
        <FrameLayout
            android:id="@id/drawer_content"
            android:layout_width="match_parent"
            android:layout_height="match_parent">
            <!-- Drawer content goes here.  -->
        </FrameLayout>
        <LinearLayout
            android:id="@id/peek_view"
            android:layout_width="wrap_content"
            android:layout_height="wrap_content"
            android:layout_gravity="center_horizontal"
            android:orientation="horizontal">
            <!-- Peek view content goes here.  -->
        <LinearLayout>
    </android.support.wearable.view.drawer.WearableDrawerView>
Listen for Drawer Events
To listen for drawer events, call setDrawerStateCallback() on your
WearableDrawerLayout and pass it an implementation of
WearableDrawerLayout.DrawerStateCallback. This interface provides callbacks
for drawer events such as onDrawerOpened(),
onDrawerClosed(), and onDrawerStatechanged().
Peeking Drawers
To set the drawers to temporarily appear, call peekDrawer() on
your WearableDrawerLayout and pass it the Gravity of the drawer.
This feature is especially useful because it allows immediate access to the
alternate drawer views or actions associated with it:
mWearableDrawerLayout.peekDrawer(Gravity.BOTTOM);